This article provides an overview of databases and discusses ANSI SQL and tells how PL/SQL, T-SQL and other SQL implementations differ from each other. And it discusses the MySQL open source database by walking through how to install and use
MySQL workbench. And, it provides an easy-to-follow tutorial on popular SQL statements.
Getting Start With Databases
For an overview of databases and how organizations store data see the article titled "
Common IT Positions & Career Plan - Software Developer Part 1" and review the section titled "Storing Enterprise Data".
Getting Started With MySQL
MySQL
is open source database software provided to users under the GN General Public
License. A GNU General Public License gives developers the "freedom" to
change the database software as well as use it as part of an application and share it. When software is open source
developers are granted access to copies of the source code. In addition,
the software is usually made available free of charge.
There are several versions of MySQL as listed on the following URL:
http://www.mysql.com/products/. This article focuses on the Community Edition of MySQL that runs on Windows.
MySQL includes a
MySQL Installer for Windows users. The MySQL Installer
invokes a wizards that steps users through the installation process to
install roughly 8 components including the "world" and "sakila" sample databases and
documentation. (Note that throughout this article I use the sakila database.) Among the components installed are the following;
- MySQL Server - The database management software that actually holds
the database tables, data and other database objects used to manage an
organization's or entity's data.
- MySQL Workbench - A graphical user interface that can be used to
query data in the database, create a data-entity relationship diagram as
well as create new database objects and perform other administrative
tasks against a MySQL database.
- MySQL for Excel - MySQL for Excel enables users to import, export
and edit MySQL data using Microsoft Excel
Downloading/Installing MySQL on Windows
Navigate to
http://dev.mysql.com/downloads/windows/installer/, scroll to the middle of the page and click on the applicable link, as shown in the picture below.
For the windows installer you can download the 32-bit only installer; or,
the 32- and 64-bit installer. To download MySQL you must have an Oracle
account. Once you log in you can download the desired file.
After you download the file be sure to verify the integrity of the file you downloaded before you
install it. This ensures the file was not tampered with.To learn more
about verifying the integrity of a file you can read Verifying a Package
Integrity at:
http://dev.mysql.com/doc/refman/5.6/en/verifying-package-integrity.html.
When you are ready, launch the installer. A message displays asking you to wait while the MySQL Installer finishes the current process. Then the Welcome screen displays.
After you click "Install MySql Products" you need to Accept the GNU General Public License to continue. You can then choose the setup type. I chose the "Full" setup type to install everything.
The software checks the system requirements to install the selected components. If you indicated that you wanted to install MySQL for Excel the components needed are added before the list of MySQL products (to be installed) displays.
When the Installation Progress window, shown above, displays click Execute to install all of the products. As you click through the windows presented by the MySQL installer the MySQL Server Configuration window displays. The option you select depends on whether the environment is for an individual or company. For example, a company might install MySQL on a Server. Developers then install MySQL and select the Developer Machine option. They can then connect to the server to get or upload database changes.
As you click through the MySQL Server Configuration another window allows you to set the MySQL Root password, as shown below.
The Root account is the account automatically used when MySQL starts. Another MySQL Server Configuration window asks if you want to start MySQL Server as a Windows Service, as shown below. Accept this default. On Windows, the recommended way to run MySQL is to install it as a Windows service. This allows MySQL to automatically start/stop as you run/close Windows.
Note that once MySQL is installed you can view the MySQL Service by right-clicking My Computer -> Manage to display the Computer Management window. You can then expand Services and Applications and select Services to view the MySQL Service and start/stop the service, as shown below.
Using MySQL Workbench
Once the Installation Complete window displays click the Finish button to display the MySQL Workbench, shown below. Notice under MySQL Connections you are logged in using the root account and, in this example, I am using the Localhost server on port 3306 (localhost:3306). Since I used the "Full" installation option the "world" and "sakila" sample databases were installed. If I double-click the Local Instance MySQL56 connection I can view all of the schemas (or databases) that exist.
The following picture shows the window that displays once the local instance connection is clicked. Notice, under schemas, you see sakila and world. You also see the information_schema and the performance_schema. The information_schema stores data about the databases. For example, information_schema includes a Tables table that stores the names of all tables in all of the schemas (i.e., all tables in the sakila database, all tables in the world database, etc.).
The Performance_schema tracks MySQL Server performance-related events such as what user accounts are logged into what host, the number of current connections and total connections, event stages (i.e., preparing for alter table, altering table, committing alter table to storage engine, etc. along with wait times, etc.) and other similar data. From the main window you can click the plus sign beside MySQL Connections to create a connection to a schema.
When you click the plus sign the Setup New Connection window displays. You can add a name to the Connection Name field and enter the schema to be selected for the connection, as shown below. If you click the Test Connection button you are prompted for the root account password. You can use the Save password in vault option to store the password.Click the OK button to create the connection.
The new connection created displays beside the Local instance connection. If you click on the "sakila_full" option (highlighted in the picture below) you will view the model and other objects for the sakila database.
The following picture shows what the Workbench looks like when a model is opened. By default the model displays on the EER Diagram Tab. This Tab shows the Entity Relationship Diagram, which displays tables and views and their relationships to one another. As you view the picture below notice the red box (on the left) highlights the Bird's Eye view of the Entity Relationship Diagram. The Toolbar (shown by a red arrow) is used to add or delete tables and views, create relationships among database objects and perform other tasks.
Database objects include the tables that hold data, views of table data, functions (that return a value when executed), etc. Each table field is associated with a data type. For example, the field that holds the date a product was purchased is associated with a date data type so the system knows the type of data to be stored . You can learn more about data types here:
http://dev.mysql.com/doc/refman/5.0/en/data-type-overview.html.
As previously mentioned other database objects include Views. Views enable developers to define what data to display by selecting table fields from two or more tables. For example, the sakila database has the "rental" table, which has the following table fields: rental_id, rental_date, inventory_id, customer_id, return_date, staff_id and last_update. If you view the data in this table it looks like the picture below.
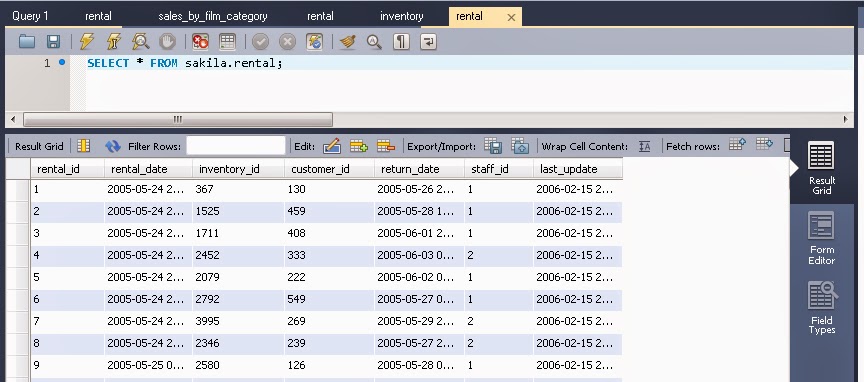
Suppose you work for a rental store. The manager wants to know the first and last name of each customer who rented a film; and, the title of the film. The above table doesn't provide that information. But, you can create a view that combines the rental table, the customer table, the inventory and the film table to create the desired details. Instead of displaying the customer_id field you can display the customer first_name field and customer last_name field from the customer table. You can use the film_id in the inventory table to display the film "title" from the film table. You would omit fields that contain data the manager doesn't want to see. Once you create the view, the manager can display the results to see the desired information. A screen capture of the SQL query and results is included below.
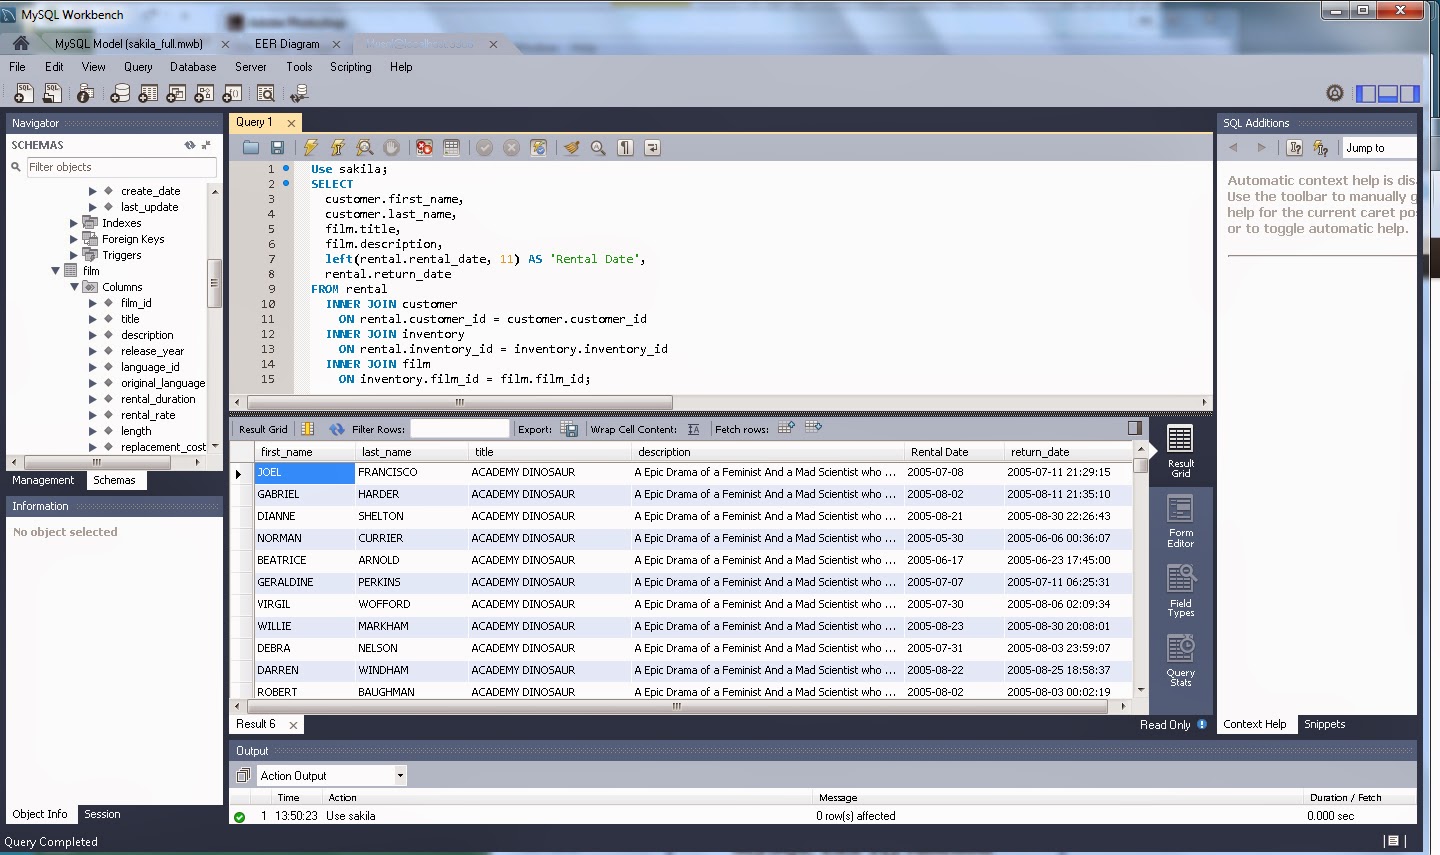
Just a quick note about the above query. The Left() function is used to return the first 11 characters from the left so only the date shows. AS 'Rental Date' defines the name of the column. And, Inner Join is used to combine the records from two tables whenever there are matching values in both tables. (This article is outdated but still provides a great overview of inner joins:
http://technet.microsoft.com/en-us/library/aa213234.) The following paragraphs discuss SQL queries in greater detail.
Introducing the Structured Query Language (SQL)
The American National Standards Institute (ANSI) defined a series of standards that defines the framework for the SQL environment, how SQL statements are to be executed (i.e., using a SQL-agent), data types to be used and the standards discuss other features needed to build, manage and query a SQL database environment. Below is a list of the ANSI standards.
- ISO/IEC 9075-1:2011 [2012], Information technology - Database languages—SQL -Part 1: Framework
- ISO/IEC 9075-2:2011, Information technology—Database languages—SQL—Part 2: Foundation
- ISO/IEC 9075-3:2008, Information technology—Database languages—SQL—Part 3: Call-Level Interface
- ISO/IEC 9075-4:2011, Information technology—Database languages—SQL—Part 4: Persistent Stored Modules
- ISO/IEC 9075-9:2008, Information technology—Database languages—SQL—Part 9: Management of External Dat
- INCITS/ISO/IEC 9075-5-1999, Information Technology - Database Languages - SQL - Part 5: Host Language Bindings
- ISO/IEC 9075-10:2008, Information technology - Database languages - SQL - Part 10: Object Language Binding
- ISO/IEC 9075-11:2011, Information technology—Database languages—SQL—Part 11: Information and Definition Schemas
- ISO/IEC 9075-13:2008, Information technology—Database languages—SQL—Part 13: SQL Routines and Types using the Java Programming Language
- ISO/IEC 9075-14:2011, Information technology—Database languages—SQL—Part 14: XML-Related Specifications
Vendors who implement a SQL database incorporate some or all of the features outlined in the above standards. Examples of database vendors include
Microsoft (SQL Server), Oracle (
Oracle & MySQL),
PostgreSQL, etc. Some vendors add new features not outlined in any of the standards. For example, Microsoft SQL Server
uses Transact-SQL and Oracle uses SQL* Plus (PL/SQL). Both of these languages have
been extended to include data types and other features not outlined in any of the ANSI standards. MySQL and Microsoft Access both use SQL; however, these implementations have also been extended. For example, Microsoft Access 2007 supports both ANSI SQL wildcard
characters and wildcard characters specific to the Microsoft
Access database engine. And,
Microsoft Access supports data types not supported by ANSI SQL. These customizations are one of the key reasons data cannot be directly shared between databases.
Getting Started With SQL Statements
In the business world users typically use an application to add or edit records in a database. (Deleting data, from a user interface, is usually not allowed. Instead, records are typically marked as inactive so that reports ran yesterday can be run at anytime in the future--with the understanding that inactive records are outdated.)
Some companies may use a tool like
Crystal Reports to create interactive reports that enable users to select options to view the desired data. Users can easily generate ad hoc, custom reports that can be exported to Excel, PDF or other popular formats. I have also seen an environment where
Microsoft Excel was used to connect to a database to view data.
Using Workbench to Generate Statements
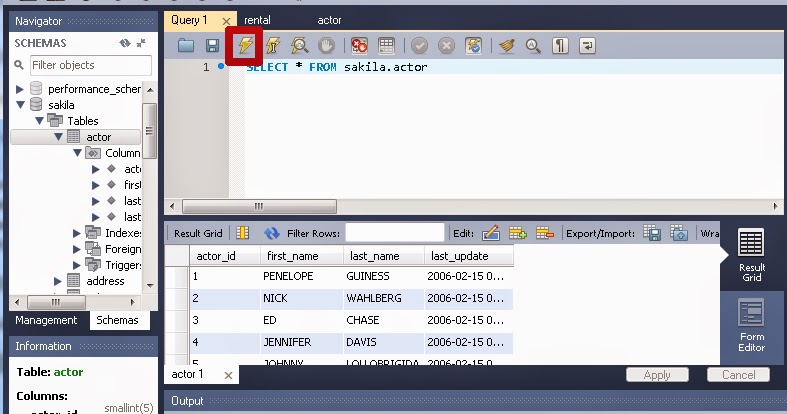
When you launch Workbook you can right-click on a schema table to access a short-cut menu. You can then select an option to have Workbench generate a statement for you. For example, right-click on the rental table under the sakila schema as shown below
Select "Select Rows - Limit 1000" as shown in the above picture. The statement displays on the rental Tab. The results display in the Results grid (as shown below) provided the Results Grid button is selected. If the Form Editor button is selected the first record displays in a Form. You can then use the form buttons to navigate through the records. If the Field Types button is selected a window displays the name of each field and the data type associated with the field.
The bottom Output window (shown below) tells the action performed and the message returned by the database. If the statement resulted in an error, an error message displays in this window. However, in the following example the statement was successful so the number of records (or rows) returned displays.
Writing SQL Statements - Directly Interacting With the Database
There are two ways to access the Query tab to execute SQL statements in Workbench. You can select a database connection
when you first launch Workbench, as previously discussed. Or, if you are
already using Workbench you can select
Database -> Connect to Database... When the Connect to Database
window displays click the OK button to access the Query Tab.
You can create SQL statements to create a database, table or view. You can also create statements to view, insert or delete data as well as perform a number of other tasks. If you want to view data stored in a database there are two values you MUST know: 1. the name of the schema (or database) that holds the data; and 2. the name of the table that holds the data. If you only know these two values but do not know the name of the table fields you can write a Select All statement like this:
SELECT * from schema.table
Following is an example:
SELECT * FROM sakila.actor
Once you add the Select All statement to the Query1 Tab you must click the Execute button to prompt Workbench to perform the requested action. Once the statement is executed the results display in the Results Grid below the Query1 tab. If you know the name(s) of the table fields that hold the data you want to view, you can add table field names instead of using the wildcard (*). For example, the following SQL statement displays data from the first_name and last_name fields of the actor table in the sakila database.
SELECT first_name, last_name FROM sakila.actor
Notice each column name is separated by a comma. However, a comma is not added between the last column name and the FROM keyword.
You can write an Insert Statement to add a new record to a database table. The Insert Statement is written as follows:
INSERT INTO sakila.actor(`actor_id`,`first_name`,`last_name`) VALUES (201,'Will','Smith');
The statement begins with the "Insert Into" keywords. The schema.table name is added along with a list of the table field names in the order in which the fields appear in the table. The "Values" keyword is added followed by the values to be inserted. In the above example, the table has a TIMESTAMP field. Notice a value is not provided. This is because the database automatically adds the date/time when the record is created. And, although the previous example shows the actor_id field (which is the primary key field) corporate databases are usually configured to automatically add this value when a record is created.
The Update Statement is used to change one or more value(s) that already exist in the database. To change a single value for a record the update statement appears as shown in the picture below.
The keyword "Update" is used followed by the schema.table name. The
keyword "Set" is then added followed by the table field name and the
updated value. The "Where" keyword is added followed by the name of the
id field (i.e., actor_id in this example) and the value of the record to
be changed, as shown in the picture below. The "Where" keyword and actor_id combination ensures only a single record is returned (i.e., where actor_id = 1. Note that primary key values are also unique.)
If multiple values are to be updated, all table fields are added along with the applicable values. However, note that the id of a record should never be changed once data has been added. This is because the existing records (in this example film records associated with the actor) will loose their association since records are associated by the id or primary key field.
You can delete a record using the Delete Statement as follows:
DELETE FROM `sakila`.`actor`
WHERE actor_id = 1;
With the Delete Statement the "Where" keyword works the same way as it does for the Update Statement. This means you indicate the id of the record to be deleted.You then execute the statement to delete the record.
Writing SQL Statements - Using an Application To Interact With the Database
When building a business application routines (or stored procedures or sprocs) are used to execute transactions. In addition variables, holders for an unknown value, are also used. For example, if a user wants to update a record; it is unknown what record the user will select to update. Therefore, a list of records is presented to the user. The user then selects the record to be updated. The id (or primary key) of the selected record is passed to the applicable routine. The routine returns the result. In this example, the Select statement is referred to as a Select with Reference statement. The following picture shows the statement in the top portion of the picture, the results in the Results Grid, and the output in the Output window.
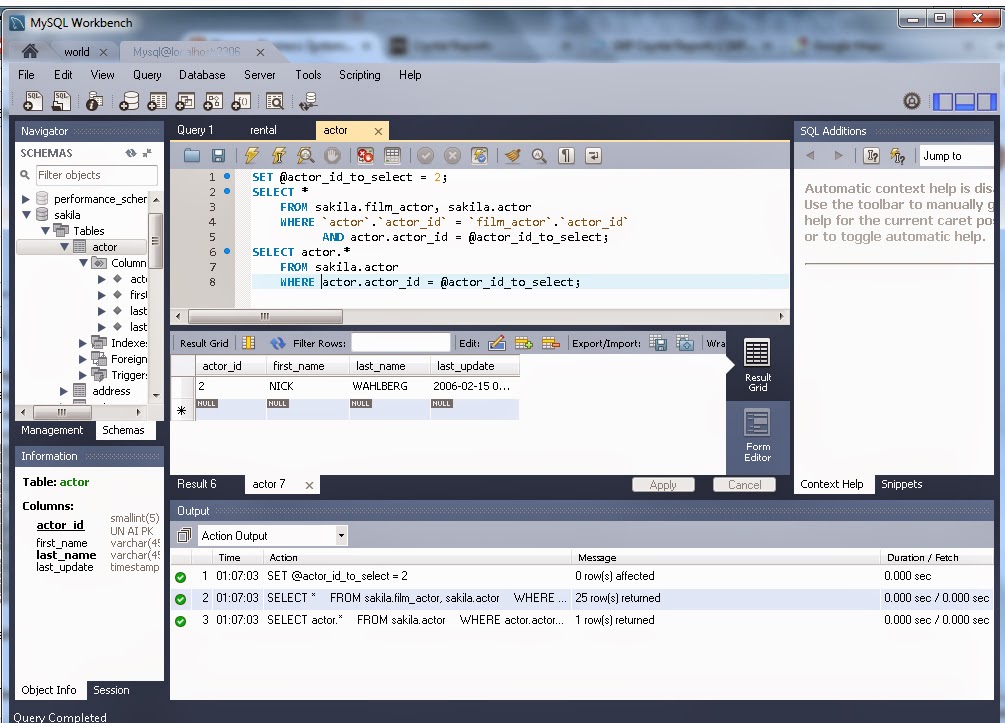
When using the Select with Reference statement the first thing that you do is set the value for the variable. In this example the variable is called @actor_id_to_select. Once we set the value of @actor_id_to_select the database automatically replaces every occurrence of the @actor_id_to_select variable with the assigned value. As previously mentioned, variables are used when a value is not known ahead of time. Using this approach enables users to select any valid (value that exists in the database) value to retrieve records that meet a specified condition. A select statement like the one above is typically used when a user wants to retrieve a specific record to update or add new details not previously supplied.
Additional Information
In this article we discussed database basics, the ANSI SQL standards and we discussed how to install and use MySQL as well as write SQL statements. If you would like to learn more about database programming and like to read books I recommend Murach at the following URL:
http://www.murach.com/books/database.htm You can also download SQL query examples to follow the tutorials outlined in the book.

 This is a computer. A computer has a brain.
 The computer’s brain is called a chip. A computer chip can think
  But a computer’s chip is not as smart as people.
 Sometimes mom or dad tells you what to do.
 Sometimes you think of things to do.
 A computer cannot think of things to do without instructions. Instructions tell the computer what to do.
 Ana knows how to create a special document.
 The special document includes a group of action words. The group of action words tells what actions a computer should perform.
 At work Ana is a Business Analyst.
 Ana writes a use case if she wants the computer to play a game. The use case looks like this: UC1. Play a Game.
 Ana writes a use case if she wants the computer to play a movie. The use case looks like this: UC2. Play a movie.
 Ana writes a use case if she wants the computer to play music. The use case looks like this: UC3. Play music.


