One of Google's more recent endeavors is its offering of solutions that enable developers to create large-scale applications at reasonable prices. Whether you're interested in developing a game that might go viral; or, creating apps to become more skilled in working with "big data" you'll likely want to check out Google App Engine. This article provides an overview of what Google App Engine is, what is has to offer and how to start using it.
Google App Engine is a web-based, hosting platform that delivers cloud services. Developers can configure a development environment to connect to App Engine; and, make use of its many features to build scalable applications that deliver on demand. Developers can create an application using Python, Java, PHP or the Go programming language on a local development environment. The application can then be deployed to Google App Engine where it can be made available to the general public. Or, a developer can limit access to the application. For example, a developer might want to invite other developers to access, use and update the application before it goes public. If an application is to only target a specific group of users; that can also be defined using App Engine. App Engine also offers powerful backend solutions that can grow as an application increases in popularity. To get started you need a Google account.
Google App Engine features are grouped into 5 categories as follows: Main, Data, Administration, Billing and Resources. These features are discussed in more detail below.
When you first log into Google App Engine your list of applications displays. If you have not created any applications the page is blank and you are only presented with a Create Application button.

From Google App Engine you can view reports, logs and even perform tasks such as "enable datastore" to use Google App Engine's datastore (discussed later) for big data.The Google App Engine features, including its datastore, are discussed later in this article we walk through the steps to create and deploy an application to the Google App Engine and then use Google App Engine features to monitor and manage the application.
Features under the Main heading provide insight into an application deployed to Google App Engine. The App Engine dashboard lists transactions and usage hours (as shown below) as well as current load and error.
 In addition, you can view information about the number of instances (of an application) running, a log of items including info, debug, warnings, errors and critical. In addition a list of the versions of an application running linked to the instances and the ability to split traffic. You can also view a list of scheduled tasks (called Cron Jobs), view tasks queues defined using the Java Task Queue configuration file or the Python Task Queue configuration file. You can also view your usage versus quota data.
The Data option provides the ability to manage, view and search data in a datastore and create indexes. Developers can also backup and restore data from Google Cloud Storage.
Google App Engine offers three options to store data as follows: App Engine Datastore, Google Cloud SQL and Google Cloud Storage. Google Cloud SQL is a serve that let you connect your application to a traditional, relational SQL database. The Google Cloud Storage, on the other hand, is a storage service (similar to Google drive) that lets developers store files along with the files' metadata.
The App Engine datastore is schemaless, which makes it more flexible than a relational database. The datastore stores data in a structure similar to that of a computer's file system in that it uses a parent/child hierarchy. The datastore is designed to automatically scale by distributing data, as necessary, as it writes to the datastore. To facilitate fast data searching queries are performed against pre-built indexes. As a result some queries that can be performed against a relational database (such as joins and subqueries) cannot be performed against the datastore.

Two key buzz words associated with cloud services, particularly when large amounts of data are involved, are availability and scalability. Availability defines the ability for you/users to access your app was needed; considering that problems may cause service interruptions such as maintenance (to apply software updates, etc.); or, a transaction that crashes the server. Scalability refers to your application's ability to spread across multiple servers and balance the load (user requests) so the application performs the same whether it has 10 or 10 million records.
The Administration includes the Application Settings, which provides the Application Title, Application Identifier (App Id), Service Account name and the application URL. If you create an application with a server component you will also see a Google APIs Console Project Number, as shown in the picture below.

If you click the Project Number link, the project opens in the Developers Console, as shown below. This provides an opportunity to enable one or more APIs (such as the Google Cloud Messaging for Android API).

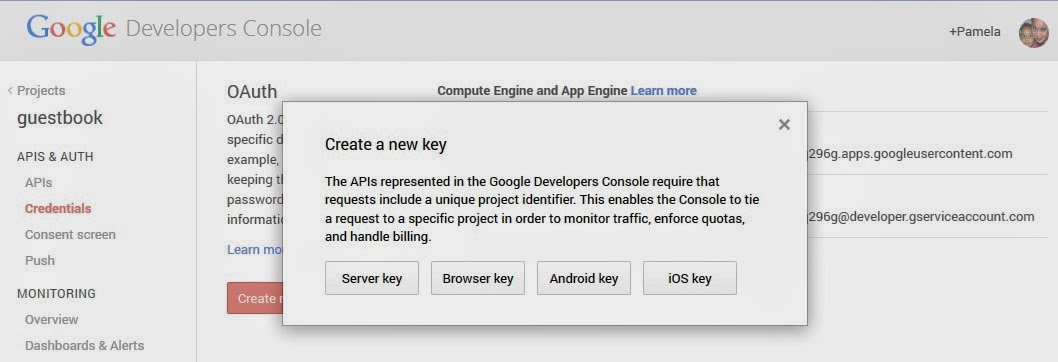
Users can also select the Credentials option to create an API key because the APIs in the Google Developers Console require that requests include a unique project identifier to monitor traffic, enforce quotas, and handle billing. Developers can create a Server key, Browser key, Android key and iOS key (as shown below).
Account Settings is also where you go to disable or delete an application as well as enable or disable datastore writes. You can also duplicate an application and enable Cloud Integration.
The Billing section provides access to your Billing Status, which is enabled when you create a Google Cloud Project.

Resources includes links to documentation and FAQs. It also provides links to the Google App Engine Developer Forum, a link to Google App Engine SDKs, access to the Google App Engine status and access to support.
To use Google App Engine you'll need to first install Eclipse and the latest Android Development Tools (ADT) Plugin if you have not done so already. If you need more information on installing Eclipse you can review my previous article titled, "Programming Mobile Apps for Android With Eclipse".

Once you are running the latest Eclipse and have installed the latest ADT Plugin you are ready to configure your environment for Google App Engine.
Once you have installed and configured Eclipse you should download and install the Java Runtime Environment (aka Java Virtual Machine) version 7 from http://www.java.com/en/download/. Installing the Java app is pretty straight forward; however, if you need more instruction you can visit https://developers.google.com/appengine/docs/java/gettingstarted/setup.

 The About ADT Features window (shown below) displays. This window shows the version of the Eclipse Java Development environment and the Eclipse Platform (4.2 in this example). In this example I would install the Plugin for Eclipse 3.8/4.2 (Juno).

To install the Google Plugin for Eclipse, Eclipse must be running. From the main menu select Help, then select Install New Software to display the Install window shown below.

Next copy the URL under the "Direct Plugin Link" column.

Paste the link in the Work with: field, as shown below. A list of the plugin tools displays. You can then select the tools to be installed.

Notice you have the option to install Maven tools. You also have the option to install the Google Web Toolkit (GWT), which can be used to build application browser-based Ajax applications and compile the code to optimized JavaScript. You can use this approach to get Maven and GWT. Or, you can can download Maven (as discussed later) and then install and configure it. And then download, install and configure GWT by accessing the following website: http://www.gwtproject.org/download.html
Once you have selected the desired tools click the Next button and follow the wizard prompts to install the selected tools. For more information see https://developers.google.com/eclipse/docs/getting_started. Once you have installed the Google Plugin for Eclipse you are now able to create even more project types, as shown in the following picture.

And, you can also access some cloud resources from within Eclipse, as shown below. Notice, in this example, the "Select App Id" window displays a list of App Ids available from the Google App Engine hosting site. And, notice the bottom of the Select App Id window shows the username used to log into the Google App Engine.

The Google Cloud SDK provides a way to connect to the Google Cloud and download and install the Google App Engine SDK. Once you have downloaded and installed the Google Cloud SDK you can follow the command line prompts as outlined in the Installation and Quick Start section at https://developers.google.com/cloud/sdk/. You will have the option to install the Google App Engine application and define the language you will use (i.e., Java, Python and PHP or Go) to build applications. The following picture shows the prompts that display once the "install.bat" file (in the google-could-sdk folder) is executed.

Once the Google Cloud SDK is installed and configured you are asked if you want the system PATH to be updated so you can use the Cloud SDK more easily. Press Y to have the Cloud SDK installer update the system PATH. If the installer is not able to update the system Path, Windows users may manually update the PATH variable.

You can then use a command line tool to perform various tasks. You can also invoke the "help" command to view a list of tasks and related commands that can be executed using the Cloud SDK.

The Google App Engine SDK includes the components developers need to create applications to be hosted by the Google App Engine. The SDK includes the .jar file and documentation for the App Engine API. And, it supports the functionality needed to test your application before it is deployed to the Google App Engine server. For example, the SDK includes the com.google.appengine.tools package, which includes the Google App Engine Tools API that can be embedded in IDEs to test and deploy Google App Engine applications. In addition, it provides the appcfg tool so developers can execute commands using the command line interface. The picture below shows some of the commands that can be executed using appcfg:

The appengine and apphosting API classes are located in the :\appengine-java-sdk-1.9.7\src\user\appengine-api-1.0-sdk-1.9.7-src\com\google folder. These classes are used when building a Google App Engine connected application.
There is a Google App Engine SDK for PHP, Python, Java and the Go programming languages. Developers can download the SDK that supports the desired language. (For this article I have downloaded and installed the Google App Ending SDK for Java.) You can download, unzip and install the Google App Engine for Java from https://developers.google.com/appengine/downloads where you will select the the link under the Package column.

This downloads the source files for the App Engine and includes tutorials in the folder called "demos". Most of the folders include a README file that provides instructions. However, note that if you plan to use Maven, it will download the Google App Engine SDK files and the source files for the Google App Engine tutorials.


Notice the pom.xml file (above) also defines the modules that makeup the project, as shown in the following picture where the modules are: guestbook-war and guestbook-ear.

To use Maven you will have to download it, install it and and then configure it.. To get Maven you will download the applicable file. For example, I downloaded the apache-maven-3.2.2-bin.zip file from http://maven.apache.org/download.cgi. If you download the zipped file, you can extract the zip file contents to a location on your hard drive. Since I am running windows I unzipped the files to the "c:/program files" directory.
Next you will need to configure the environment variables. Since I am using windows I had to access the System Properties window, and then select the Advanced tab. I then selected Environment Variables, as shown below.

You can then add the variables necessary to use Maven.The following window shows the variables I added as outlined in the Readme.txt file in the root folder of the apache-maven-3.2.2 folder created when I unzipped the apache-maven-3.2.2-bin.zip file.

Once you have followed the instructions to install Maven; you will want to verify that it is installed correctly. To verify Maven is installed you do the following:
From the command prompt type: mvn -v, as shown in the picture below. If Maven is correctly installed the Maven version, along with the other information shown below, displays.

Once you confirm that Maven is installed correctly you can follow the instructions outlined in the following location: https://developers.google.com/appengine/docs/java/gettingstarted/creating#creating_the_project to get the project files. After you complete the instructions the following messages display and the project is downloaded to the location you specified.

To execute a command for a Maven project you must first navigate to the root folder of the project. As shown below, I want to execute commands for the guestbook project (located at c:\users\owner\documents\projects\guestbook). Therefore, I first used the command to change to the guestbook directory. Then I executed my commands.


Maven's functionality is built from a variety of plugins. To learn more about Maven plugins you can visit the following link: http://maven.apache.org/plugins/. The Maven Documentation site is located at: https://cwiki.apache.org/confluence/display/MAVEN/Index

When the Create an Application webpage displays add an Application Identifier in the applicable field and be sure to click the Check Availability button.

If the Identifier you added is not available: Or, if the name you entered does not meet the applicable criteria an error message, like the one shown below, displays. You must make another selection until you enter an Identifier that is not in use and meets the naming criteria.
Sorry, "test" is invalid. Application Identifier must be between 6 and 30 characters. Lowercase letters, digits, and hyphens are acceptable characters. Must start with a letter. Trailing hyphens are prohibited.
Next enter an Application Title and then click the Create Application button at the button of the page. The application is created and is added to the dashboard. Next, launch Eclipse and select File ->New -> Project to display the New Project windows. Expand the Google folder and select Web Application Project then click Next.
 The Create a Web Application Project window, shown below, displays. If you installed the Google Web Toolkit, that option should be available. You should also have a Use Google App Engine checkbox to indicate that you want to use Google App Engine. Enter a Project Name and a Package name for the new application. Leave the Use Google App Engine checkbox checked.

Under the Identifiers for Google App Engine section select the Use App ID option. Then click Browse. The Select App ID window displays. Select the Application Identifier you created then click the OK button. Make sure the Generate Project Sample Code checkbox is checked.

Once all required fields are completed, click the Finish button. The new project displays in the Project Explorer window.

You can now deploy the application and it should work. Right click on the project to be deployed to Google App Engine. Select Google -> Deploy to App Engine, as shown below.

The Deploy window displays.

Accept the defaults and click the Deploy button. The Deploying window, shown below, displays.

Once the application is deployed to Google App Engine, the Web Application Starter page displays, as shown below.

Enter a name in the Please enter your name box then click Send. The Google App Engine server replies, as shown below.
 If your starter application worked; congratulations your development environment is configured correctly and you can begin developing scalable applications built on Google App Engine. Below is a list of resources you can access to learn more about Google App Engine.
https://developers.google.com//cloud
https://developers.google.com/appengine/docs/whatisgoogleappengine
Google App Engine Project Page: http://code.google.com/p/googleappengine/
Google App Engine Issue Tracker http://code.google.com/p/googleappengine/issues/list
Submit an Issue: https://code.google.com/p/googleappengine/wiki/FilingIssues?tm=3
What Google App Engine Is
Google App Engine is a web-based, hosting platform that delivers cloud services. Developers can configure a development environment to connect to App Engine; and, make use of its many features to build scalable applications that deliver on demand. Developers can create an application using Python, Java, PHP or the Go programming language on a local development environment. The application can then be deployed to Google App Engine where it can be made available to the general public. Or, a developer can limit access to the application. For example, a developer might want to invite other developers to access, use and update the application before it goes public. If an application is to only target a specific group of users; that can also be defined using App Engine. App Engine also offers powerful backend solutions that can grow as an application increases in popularity. To get started you need a Google account.
What Google App Engine Has to Offer
Google App Engine features are grouped into 5 categories as follows: Main, Data, Administration, Billing and Resources. These features are discussed in more detail below.
When you first log into Google App Engine your list of applications displays. If you have not created any applications the page is blank and you are only presented with a Create Application button.
From Google App Engine you can view reports, logs and even perform tasks such as "enable datastore" to use Google App Engine's datastore (discussed later) for big data.The Google App Engine features, including its datastore, are discussed later in this article we walk through the steps to create and deploy an application to the Google App Engine and then use Google App Engine features to monitor and manage the application.
Main
Features under the Main heading provide insight into an application deployed to Google App Engine. The App Engine dashboard lists transactions and usage hours (as shown below) as well as current load and error.
Data
The Data option provides the ability to manage, view and search data in a datastore and create indexes. Developers can also backup and restore data from Google Cloud Storage.
Google App Engine offers three options to store data as follows: App Engine Datastore, Google Cloud SQL and Google Cloud Storage. Google Cloud SQL is a serve that let you connect your application to a traditional, relational SQL database. The Google Cloud Storage, on the other hand, is a storage service (similar to Google drive) that lets developers store files along with the files' metadata.
The App Engine datastore is schemaless, which makes it more flexible than a relational database. The datastore stores data in a structure similar to that of a computer's file system in that it uses a parent/child hierarchy. The datastore is designed to automatically scale by distributing data, as necessary, as it writes to the datastore. To facilitate fast data searching queries are performed against pre-built indexes. As a result some queries that can be performed against a relational database (such as joins and subqueries) cannot be performed against the datastore.
Two key buzz words associated with cloud services, particularly when large amounts of data are involved, are availability and scalability. Availability defines the ability for you/users to access your app was needed; considering that problems may cause service interruptions such as maintenance (to apply software updates, etc.); or, a transaction that crashes the server. Scalability refers to your application's ability to spread across multiple servers and balance the load (user requests) so the application performs the same whether it has 10 or 10 million records.
Administration
The Administration includes the Application Settings, which provides the Application Title, Application Identifier (App Id), Service Account name and the application URL. If you create an application with a server component you will also see a Google APIs Console Project Number, as shown in the picture below.
If you click the Project Number link, the project opens in the Developers Console, as shown below. This provides an opportunity to enable one or more APIs (such as the Google Cloud Messaging for Android API).
Users can also select the Credentials option to create an API key because the APIs in the Google Developers Console require that requests include a unique project identifier to monitor traffic, enforce quotas, and handle billing. Developers can create a Server key, Browser key, Android key and iOS key (as shown below).
Account Settings is also where you go to disable or delete an application as well as enable or disable datastore writes. You can also duplicate an application and enable Cloud Integration.
Billing
The Billing section provides access to your Billing Status, which is enabled when you create a Google Cloud Project.
Resources
Resources includes links to documentation and FAQs. It also provides links to the Google App Engine Developer Forum, a link to Google App Engine SDKs, access to the Google App Engine status and access to support.
How to Start Using Google App Engine
To use Google App Engine you'll need to first install Eclipse and the latest Android Development Tools (ADT) Plugin if you have not done so already. If you need more information on installing Eclipse you can review my previous article titled, "Programming Mobile Apps for Android With Eclipse".
If you have already set up your development environment, you will want to make sure you are using the Eclipse IDE 4.2 or higher and make sure you have upgraded to the latest Android Development Tools (ADT) Plugin. (Google Update Site for Eclipse 4.2 - http://dl.google.com/eclipse/plugin/4.2 )
Once you are running the latest Eclipse and have installed the latest ADT Plugin you are ready to configure your environment for Google App Engine.
Get the Java Runtime Environment
Once you have installed and configured Eclipse you should download and install the Java Runtime Environment (aka Java Virtual Machine) version 7 from http://www.java.com/en/download/. Installing the Java app is pretty straight forward; however, if you need more instruction you can visit https://developers.google.com/appengine/docs/java/gettingstarted/setup.
Also download and install the Java Platform (JDK) from http://www.oracle.com/technetwork/java/javase/downloads/index.html.
Get the Google App Engine Tools
There are several different ways to install the Google App Engine tools. The Google Plugin for Eclipse provides a way to install the Google App Engine tools. However, you must first determine the correct version of the plugin needed based on the version of the development environment installed on your computer. To determine the version of your development environment launch Eclipse. Next, select Help then About ADT to display the About ADT window, shown below. Next select the Eclipse button, outlined with a red box below.To install the Google Plugin for Eclipse, Eclipse must be running. From the main menu select Help, then select Install New Software to display the Install window shown below.
Next copy the URL under the "Direct Plugin Link" column.
Paste the link in the Work with: field, as shown below. A list of the plugin tools displays. You can then select the tools to be installed.
Notice you have the option to install Maven tools. You also have the option to install the Google Web Toolkit (GWT), which can be used to build application browser-based Ajax applications and compile the code to optimized JavaScript. You can use this approach to get Maven and GWT. Or, you can can download Maven (as discussed later) and then install and configure it. And then download, install and configure GWT by accessing the following website: http://www.gwtproject.org/download.html
Once you have selected the desired tools click the Next button and follow the wizard prompts to install the selected tools. For more information see https://developers.google.com/eclipse/docs/getting_started. Once you have installed the Google Plugin for Eclipse you are now able to create even more project types, as shown in the following picture.
And, you can also access some cloud resources from within Eclipse, as shown below. Notice, in this example, the "Select App Id" window displays a list of App Ids available from the Google App Engine hosting site. And, notice the bottom of the Select App Id window shows the username used to log into the Google App Engine.
Google Cloud SDK
The Google Cloud SDK provides a way to connect to the Google Cloud and download and install the Google App Engine SDK. Once you have downloaded and installed the Google Cloud SDK you can follow the command line prompts as outlined in the Installation and Quick Start section at https://developers.google.com/cloud/sdk/. You will have the option to install the Google App Engine application and define the language you will use (i.e., Java, Python and PHP or Go) to build applications. The following picture shows the prompts that display once the "install.bat" file (in the google-could-sdk folder) is executed.
Once the Google Cloud SDK is installed and configured you are asked if you want the system PATH to be updated so you can use the Cloud SDK more easily. Press Y to have the Cloud SDK installer update the system PATH. If the installer is not able to update the system Path, Windows users may manually update the PATH variable.
You can then use a command line tool to perform various tasks. You can also invoke the "help" command to view a list of tasks and related commands that can be executed using the Cloud SDK.
Google App Engine SDK for Java
The Google App Engine SDK includes the components developers need to create applications to be hosted by the Google App Engine. The SDK includes the .jar file and documentation for the App Engine API. And, it supports the functionality needed to test your application before it is deployed to the Google App Engine server. For example, the SDK includes the com.google.appengine.tools package, which includes the Google App Engine Tools API that can be embedded in IDEs to test and deploy Google App Engine applications. In addition, it provides the appcfg tool so developers can execute commands using the command line interface. The picture below shows some of the commands that can be executed using appcfg:
The appengine and apphosting API classes are located in the :\appengine-java-sdk-1.9.7\src\user\appengine-api-1.0-sdk-1.9.7-src\com\google folder. These classes are used when building a Google App Engine connected application.
There is a Google App Engine SDK for PHP, Python, Java and the Go programming languages. Developers can download the SDK that supports the desired language. (For this article I have downloaded and installed the Google App Ending SDK for Java.) You can download, unzip and install the Google App Engine for Java from https://developers.google.com/appengine/downloads where you will select the the link under the Package column.
This downloads the source files for the App Engine and includes tutorials in the folder called "demos". Most of the folders include a README file that provides instructions. However, note that if you plan to use Maven, it will download the Google App Engine SDK files and the source files for the Google App Engine tutorials.
Get Maven
Maven is a tool that can be used to download a project and the related project files. Maven projects include the pom.xml file in the root directory and pom.xml files in the subdirectories. The pom.xml file in the root directory defines the structure of the project. As shown in the following picture the pom.xml root directory file includes the project's groupID (com.google.appengine.demos), artifactId (guestbook) and version (1.0-SNAPSHOT).Notice the pom.xml file (above) also defines the modules that makeup the project, as shown in the following picture where the modules are: guestbook-war and guestbook-ear.
To use Maven you will have to download it, install it and and then configure it.. To get Maven you will download the applicable file. For example, I downloaded the apache-maven-3.2.2-bin.zip file from http://maven.apache.org/download.cgi. If you download the zipped file, you can extract the zip file contents to a location on your hard drive. Since I am running windows I unzipped the files to the "c:/program files" directory.
Next you will need to configure the environment variables. Since I am using windows I had to access the System Properties window, and then select the Advanced tab. I then selected Environment Variables, as shown below.
You can then add the variables necessary to use Maven.The following window shows the variables I added as outlined in the Readme.txt file in the root folder of the apache-maven-3.2.2 folder created when I unzipped the apache-maven-3.2.2-bin.zip file.
Once you have followed the instructions to install Maven; you will want to verify that it is installed correctly. To verify Maven is installed you do the following:
From the command prompt type: mvn -v, as shown in the picture below. If Maven is correctly installed the Maven version, along with the other information shown below, displays.
Once you confirm that Maven is installed correctly you can follow the instructions outlined in the following location: https://developers.google.com/appengine/docs/java/gettingstarted/creating#creating_the_project to get the project files. After you complete the instructions the following messages display and the project is downloaded to the location you specified.
To execute a command for a Maven project you must first navigate to the root folder of the project. As shown below, I want to execute commands for the guestbook project (located at c:\users\owner\documents\projects\guestbook). Therefore, I first used the command to change to the guestbook directory. Then I executed my commands.
Maven's functionality is built from a variety of plugins. To learn more about Maven plugins you can visit the following link: http://maven.apache.org/plugins/. The Maven Documentation site is located at: https://cwiki.apache.org/confluence/display/MAVEN/Index
Testing Your Development Environment
Once you have everything set up you can test your environment by building a project that generates sample code. To begin, log into the Google App Engine Dashboard at https://appengine.google.com/ . If you have not created any application your dashboard looks like the one below. Click the Create Application button, highlighted below with a red box.When the Create an Application webpage displays add an Application Identifier in the applicable field and be sure to click the Check Availability button.
If the Identifier you added is not available: Or, if the name you entered does not meet the applicable criteria an error message, like the one shown below, displays. You must make another selection until you enter an Identifier that is not in use and meets the naming criteria.
Sorry, "test" is invalid. Application Identifier must be between 6 and 30 characters. Lowercase letters, digits, and hyphens are acceptable characters. Must start with a letter. Trailing hyphens are prohibited.
Next enter an Application Title and then click the Create Application button at the button of the page. The application is created and is added to the dashboard. Next, launch Eclipse and select File ->New -> Project to display the New Project windows. Expand the Google folder and select Web Application Project then click Next.
Under the Identifiers for Google App Engine section select the Use App ID option. Then click Browse. The Select App ID window displays. Select the Application Identifier you created then click the OK button. Make sure the Generate Project Sample Code checkbox is checked.
Once all required fields are completed, click the Finish button. The new project displays in the Project Explorer window.
You can now deploy the application and it should work. Right click on the project to be deployed to Google App Engine. Select Google -> Deploy to App Engine, as shown below.
The Deploy window displays.
Accept the defaults and click the Deploy button. The Deploying window, shown below, displays.
Once the application is deployed to Google App Engine, the Web Application Starter page displays, as shown below.
Enter a name in the Please enter your name box then click Send. The Google App Engine server replies, as shown below.
https://developers.google.com//cloud
https://developers.google.com/appengine/docs/whatisgoogleappengine
Google App Engine Project Page: http://code.google.com/p/googleappengine/
Google App Engine Issue Tracker http://code.google.com/p/googleappengine/issues/list
Submit an Issue: https://code.google.com/p/googleappengine/wiki/FilingIssues?tm=3