In my previous article titled: Mobile Software Programming: Designing & Building Mobile Apps (Android) I discuss the basic concepts associated with designing and building a mobile application or game for Android. This article provides insight into creating an Android app (whether a game or not game app). It discusses the core files and folders included in an Android app; and, it also discusses the Git tool, which can be used to download project files for the applications (i.e., camera, calendar, calculator, etc.) that come preinstalled on an Android device. If you are just getting started with Android programming this article will help you to follow the Building Your First App tutorial since it provides screen captures and some steps not outlined in the tutorial.
Before building an Android app you must download and install the Android SDK (the ADT Bundle includes the Eclipse IDE). Eclipse is the development platform used to write, run, test and deploy Android apps. When you initially install the SDK all of the tools are not automatically installed. Instead, you will need to relaunch the SDK Manager and select the additional tools that you want to install.
Note: You will want to make sure you select Google Play Services if you want to build custom apps that will incorporate Google Maps, Google+, display ads from within your app, etc. and/or build games.

Once you install the Android Developer Tools (ADT) Bundle you can launch Eclipse to access the SDK Manager, shown above. From the Eclipse menu you can select Window -> Android SDK Manager (as shown below). When the Android SDK Manager displays simply click on the additional components you want installed.

The article titled Creating an Android Project does a good job of explaining how to create an Android project. There are several concepts you will encounter when working with an Android project. First, Eclipse will prompt you for a Workspace folder. Once you select a Workspace folder for your session (considering that each time you launch the IDE you are starting a session) Eclipse will store your project files in the Workspace folder. You can use a single Workspace for all projects. It's up to you. And, it largely depends on how you want to organize your projects.

If you plan to use a single Workspace, notice you are given the ability to check the "Use this as the default and do not ask again" checkbox so you do not need to specify a Workspace each time you access Eclipse.
When you create a new Android App project Eclipse creates a new folder (in the Workspace folder) using the project name you specify. It adds the project folders and files required to support an Android application project. The following paragraphs provide a brief overview of the key folders/files that make up the Android app project:

libs - This folder includes the JAR file, which includes classes used by your application. The following picture shows the contents of the android-support-v4.jar file

res - This folder includes the resource files used by the application including the activity_main.xml file, which includes the layout and other settings for your app. It also includes the images used by your application along with other files.
src - This folder includes the Activity class that is executed when your application runs. For example, it includes theonCreateOptionsMenu(Menu menu) procedure that adds the items to your application's action bar, if it includes one.

You can read more about project folders and files by reading the Managing Projects documentation at http://developer.android.com/tools/projects/index.html .
Once you complete the tutorial or build an application you will want to run it to make sure it works. If you have an Android device you can test your application on your device. However, to do so you must first set the developer options on your device. The Developer options window (shown below) is available from Settings. You must enable USB debugging. Doing this allows Eclipse to deploy your application to your device.

Once you have enabled USB debugging you can connect your device to your computer hosting your Android App development environment. (After I connected my device to my computer I set the USB Connection Type as Mass storage.) You can then select run from the Eclipse menu. Once Eclipse recognizes your device it appears as an option from the Android Device Choose window (invoked by selecting Run).

If you select your device and click OK, Eclipse will deploy your Android app to your device. For more information you can read the documentation titled Run On a Real Device. As shown in the following picture the custom Android App I deployed to my Android phone is called PVL Sample App. (In case you are wondering I do not play Candy Crush or color in the Coloring Book. My little one plays with them (o: )

If you don't have an Android device don't fret. You can still join the Android development movement. The Eclipse environment provides a way for you to create an emulator to which you can deploy your apps. You can select Android Virtual Device Manager from the Window menu in Eclipse. The Android Virtual Device Manager will display (as shown below).

You can then create a New device. You need to select the type of device you want to create and define the settings for the device

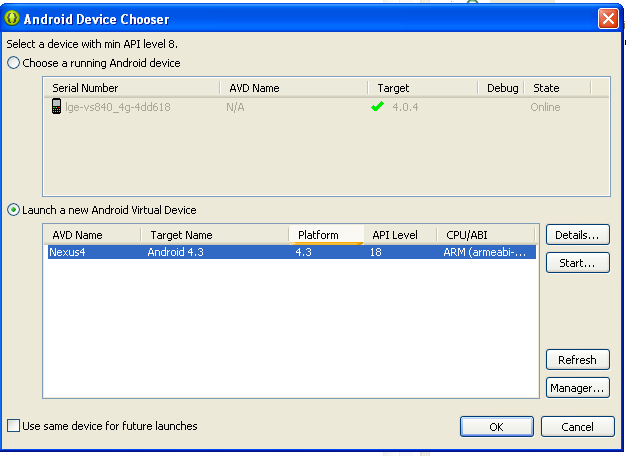
Once you create the device you can use the Android Device Chooser to Launch a new Android Virtual Device, as shown below.
The following picture shows the PVL Sample App deployed to a virtual tablet. You can then test the application's behavior to ensure it performs as it should.


Google has posted trainings for individuals who want to learn Android app programming. The trainings are located at http://developer.android.com/training/index.html . It's best to follow the trainings in sequence if you are not an experienced Android app developer because the tutorials start with basic concepts and as the training progresses the concepts increase in complexity.
You can download and view core source project files associated with Android, which includes the project files for the camera, calendar, contacts and other apps on your Android device. To get the files you must first install the Git application. Git is available from the following location: http://git-scm.com/downloads . Once you have downloaded and installed Git you can clone the Android repository that contains the project files (available from the following location: https://android.googlesource.com/ ).
The URL for the repository is used to direct Git to the repository you want to clone. The Clone Git Repository wizard allows you to select the releases and other options associated with cloning the repository.

You can then create a new project from existing code and tell Eclipse to "copy projects into workspace". The project is then added to the workspace and can be deployed to a real or virtual device for testing. A future post will provide more insight on downloading, accessing and using Git repository files within Eclipse.
The following resources pertain to working with the Android Open Source project . They provide great insight into Git. You will want to read Codelines, Branches, and Releases at http://source.android.com/source/code-lines.html; and, you may also want to look at Codenames, Tags, and Build Numbers at http://source.android.com/source/build-numbers.html . The documentation on Developing is also a great resource: http://source.android.com/source/developing.html . Lastly, a useful list of Git Resources is located at http://source.android.com/source/git-resources.html . The resource list includes a link to an online version of the published book Pro Git for those seeking to gain expert-level Git skills.
Getting Started
Before building an Android app you must download and install the Android SDK (the ADT Bundle includes the Eclipse IDE). Eclipse is the development platform used to write, run, test and deploy Android apps. When you initially install the SDK all of the tools are not automatically installed. Instead, you will need to relaunch the SDK Manager and select the additional tools that you want to install.
Note: You will want to make sure you select Google Play Services if you want to build custom apps that will incorporate Google Maps, Google+, display ads from within your app, etc. and/or build games.
Once you install the Android Developer Tools (ADT) Bundle you can launch Eclipse to access the SDK Manager, shown above. From the Eclipse menu you can select Window -> Android SDK Manager (as shown below). When the Android SDK Manager displays simply click on the additional components you want installed.
Android Projects
The article titled Creating an Android Project does a good job of explaining how to create an Android project. There are several concepts you will encounter when working with an Android project. First, Eclipse will prompt you for a Workspace folder. Once you select a Workspace folder for your session (considering that each time you launch the IDE you are starting a session) Eclipse will store your project files in the Workspace folder. You can use a single Workspace for all projects. It's up to you. And, it largely depends on how you want to organize your projects.
If you plan to use a single Workspace, notice you are given the ability to check the "Use this as the default and do not ask again" checkbox so you do not need to specify a Workspace each time you access Eclipse.
Project Folders/Files
When you create a new Android App project Eclipse creates a new folder (in the Workspace folder) using the project name you specify. It adds the project folders and files required to support an Android application project. The following paragraphs provide a brief overview of the key folders/files that make up the Android app project:
.settings - This folder includes the PREFS file that defines Eclipse preferences for the compiler including target platform and compiler compliance that indicates the JDT (Java Development Tools) version the source
should conform to. Eclipse automatically sets these levels.
bin - Includes the project classes and the AndroidManifest.XML file required to run Android applications.
gen - The Gen folder includes the Java Language Source Files for the project. These files define the build configuration and application settings such as the theme settings, activity horizontal and vertical margins specified by the developer (through coding), buttons added to the application, etc.
libs - This folder includes the JAR file, which includes classes used by your application. The following picture shows the contents of the android-support-v4.jar file
res - This folder includes the resource files used by the application including the activity_main.xml file, which includes the layout and other settings for your app. It also includes the images used by your application along with other files.
src - This folder includes the Activity class that is executed when your application runs. For example, it includes theonCreateOptionsMenu(Menu menu) procedure that adds the items to your application's action bar, if it includes one.
.project - This file manages project related information such as project name, project description and other elements as shown in the following picture.
You can read more about project folders and files by reading the Managing Projects documentation at http://developer.android.com/tools/projects/index.html .
Running Your App On an Android Device
Once you complete the tutorial or build an application you will want to run it to make sure it works. If you have an Android device you can test your application on your device. However, to do so you must first set the developer options on your device. The Developer options window (shown below) is available from Settings. You must enable USB debugging. Doing this allows Eclipse to deploy your application to your device.
Once you have enabled USB debugging you can connect your device to your computer hosting your Android App development environment. (After I connected my device to my computer I set the USB Connection Type as Mass storage.) You can then select run from the Eclipse menu. Once Eclipse recognizes your device it appears as an option from the Android Device Choose window (invoked by selecting Run).
If you select your device and click OK, Eclipse will deploy your Android app to your device. For more information you can read the documentation titled Run On a Real Device. As shown in the following picture the custom Android App I deployed to my Android phone is called PVL Sample App. (In case you are wondering I do not play Candy Crush or color in the Coloring Book. My little one plays with them (o: )
Creating an Emulator for Your App
If you don't have an Android device don't fret. You can still join the Android development movement. The Eclipse environment provides a way for you to create an emulator to which you can deploy your apps. You can select Android Virtual Device Manager from the Window menu in Eclipse. The Android Virtual Device Manager will display (as shown below).
You can then create a New device. You need to select the type of device you want to create and define the settings for the device
Once you create the device you can use the Android Device Chooser to Launch a new Android Virtual Device, as shown below.
The following picture shows the PVL Sample App deployed to a virtual tablet. You can then test the application's behavior to ensure it performs as it should.
Packages
Java classes are organized by Packages. Classes contain procedures that are used by importing the package (as shown in the picture below). A list of the Android packages and classes can be viewed at http://developer.android.com/reference/packages.html .Android Training & Sample Apps
Google has posted trainings for individuals who want to learn Android app programming. The trainings are located at http://developer.android.com/training/index.html . It's best to follow the trainings in sequence if you are not an experienced Android app developer because the tutorials start with basic concepts and as the training progresses the concepts increase in complexity.
You can download and view core source project files associated with Android, which includes the project files for the camera, calendar, contacts and other apps on your Android device. To get the files you must first install the Git application. Git is available from the following location: http://git-scm.com/downloads . Once you have downloaded and installed Git you can clone the Android repository that contains the project files (available from the following location: https://android.googlesource.com/ ).
The URL for the repository is used to direct Git to the repository you want to clone. The Clone Git Repository wizard allows you to select the releases and other options associated with cloning the repository.
You can then create a new project from existing code and tell Eclipse to "copy projects into workspace". The project is then added to the workspace and can be deployed to a real or virtual device for testing. A future post will provide more insight on downloading, accessing and using Git repository files within Eclipse.
More About Git
The following resources pertain to working with the Android Open Source project . They provide great insight into Git. You will want to read Codelines, Branches, and Releases at http://source.android.com/source/code-lines.html; and, you may also want to look at Codenames, Tags, and Build Numbers at http://source.android.com/source/build-numbers.html . The documentation on Developing is also a great resource: http://source.android.com/source/developing.html . Lastly, a useful list of Git Resources is located at http://source.android.com/source/git-resources.html . The resource list includes a link to an online version of the published book Pro Git for those seeking to gain expert-level Git skills.