This article focuses on building Facebook apps and games for Android. For those of you already versed in Android programming; or, those of you who have started to learn Android programming you can learn to build Facebook apps to extend your skills and increase your marketability. This article provides you with an overview of application and game programming for Facebook. To get started with Android programming you may want to read my article titled Programming Mobile Apps for Android With Eclipse.
If you don't have a Facebook account, you must create one to become a Facebook developer. You can then log into your Facebook account and visit the Facebook Developer home page https://developers.facebook.com/. You will need to click the Register button and follow the Registration wizard steps that will walk you through "1. Accepting the terms", "2. Verifying your account", "3. Telling us about you" and "4. Building your integration", which is actually your Congratulations message because you can create an application to get started. (For more information you can refer to the documentation called: "How to Create a Facebook Developer Account" .)

Once you have created a Developer account you will be presented with the Facebook Dashboard, as shown below. You can then use the Create New App button to begin creating your Facebook app (as discussed later in this post).

Facebook provides a number of software development kits (SDK's). Developers can download the SDK that corresponds with the type of applications and/or games developers want to create. Following is a list of the available SDKs used to build Facebook apps and games for mobile devices or the web:
If you haven't configured your development environment to build Android apps you will want to see my article titled Mobile Software Programming: Designing & Building Mobile Apps (Android) to get started. You can then read the article Programming Mobile Apps for Android With Eclipse) before performing the steps outlined in this article. To build Facebook apps or games you must have an environment capable of building Android apps. You can then install the Facebook SDK for Android to get started. The Facebook SDK for Android includes sample code for apps so developers have examples that show how to properly code and design for Facebook as well as use Facebook authentication. And, the Facebook website has tutorials and provides links to working samples.
Once you have configured Eclipse to build Android apps you are ready to further configure your environment to build Facebook apps and games. The remainder of this article will outline how to create an emulator that can run Facebook (so you can test your apps and games), how to use a real Android to run your apps and games, how to import the SDK and samples into Eclipse and how to find sample code and tutorials so you can learn from existing projects.
Download & Extract the Facebook SDK for Android
The Facebook SDK for Android includes sample apps and the FBAndroid-3.5.apk file, which you can install on an emulator to test your Facebook apps. To use an emulator you will need to install the Android 2.2 (API 8) package, create and start the emulator and install the FBAndroid-3.5.apk onto the emulator as discussed below.
You can download the Facebook SDK for Android by visiting https://developers.facebook.com/docs/android/.
Install Android 2.2 (API 8)
To test your Facebook application using an Android Virtual Device you will need to install the Android 2.2 (API 8). To do this from within Eclipse select Window -> Android SDK Manager (alternatively you can access the SDK Manager by locating and clicking the SDK Manager.exe file on your computer). When the Android SDK Manager displays select the Android 2.2 (API 8) options, as shown in the following picture. Then click the button to install the packages.

Create and Start the Android Virtual Device
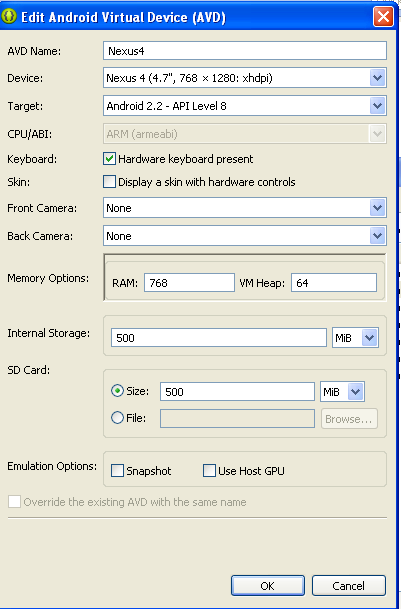
Once you have installed the Android 2.2 (API 8) you can create an emulator device that uses the Android 2.2 (API 8) as the target so you can run the Facebook samples.

Once you have created the emulator you can start the emulator. The emulator must be running to install the FBAndroid-3.5.apk file.

Install Facebook on the Android Virtual Device
Once the emulator is running you can use the adb.exe file, which was installed when you installed the Android SDK.The adb.exe is the Android Debug Bridge, which is a command-line tool used to communicate with an instance of an emulator or Android devices that are connected to computer running the development environment. If you are a Windows user you will need to launch the Command window (as shown below). (Note that Macintosh users will want to launch the Terminal window in Utilities.)

You will need to change to the directory that has the adb.exe file, which is the sdk\platform-tools folder created when you installed the Android SDK.

After you have installed the FBAndroid-3.5.apk file you will notice the emulator can be used to access Facebook.

If you plan to use a real Android device to test your apps you can download the Facebook app onto your Android device, if you haven't done so already. Whether you use an emulator or real Android device you will be able to run the Facebook SDK samples after you have imported the Facebook SDK into Eclipse.
To setup Eclipse to use the Facebook SDK and import the samples you must import the Facebook SDK folder into Eclipse. This section provides an overview on how to import the Facebook SDK. However, before importing the Facebook SDK you will want to create a new workspace for the Facebook samples.
To import the Facebook SDK and sample apps select File -> Import from the Eclipse menu. Then select Existing Projects Into Workspace and click Next.

Browse to the location that contains the extracted Facebook SDK for Android folder. Select the Facebook-android-sdk-3.5 folder and click Next.

A window displays a list of all the projects to be imported into Eclipse. This window has a "Copy projects into workspace" option, which should be left unselected. Click the "Select All" button to select the Facebook SDK and all projects; next, click Finish. The projects are all imported into Eclipse. You can now run the sample apps and view the code.

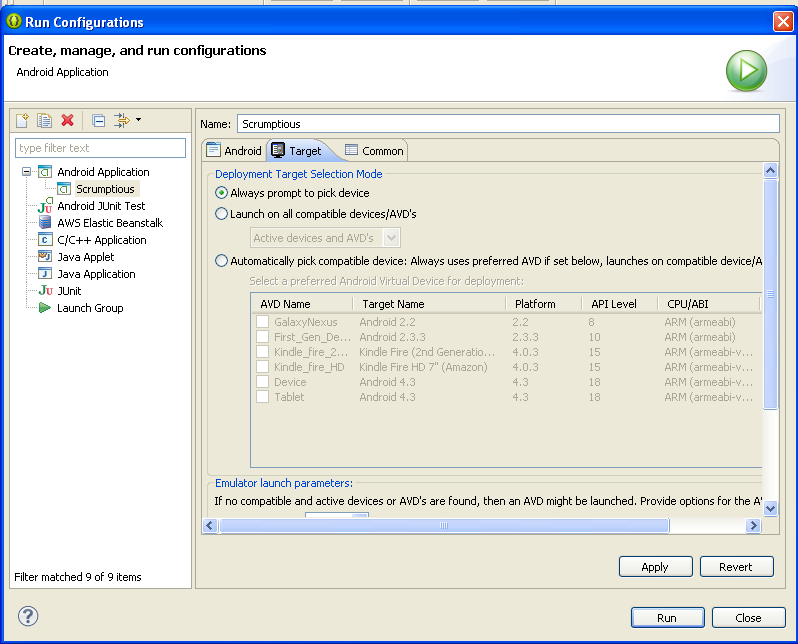
To select a target device; or, have Eclipse prompt you for a device you can select Run -> Run Configurations. The Android tab lets you select the project for which you want to select a device; or, have Eclipse prompt you for a device.

After you have selected a project, click the Target tab and select the applicable option. In the following example, the "Always Prompt for a Device" option was selected so Eclipse will always ask the developer what device the project is to run on. Alternatively, you can select the Android emulator running the API 8 package.

If the sample projects show any errors you can clean the projects by selecting Project -> Clean from within Eclipse. You can read more on getting started with the Facebook SDK for Android by visiting https://developers.facebook.com/docs/android/getting-started/facebook-sdk-for-android/.
If you want to run the samples using an emulator device be sure to start the emulator and make sure it is properly running before running the application. If you intend to use an Android device make sure the device is connected and that you have configured the Developer options (for more information see Programming Mobile Apps for Android With Eclipse).

Note that you run the Facebook apps for Android the same way you run any other Android app (i.e., Run As -> Android Application).
In addition to code samples, Facebook provides a number of tutorials that will walk you through building Facebook applications for Android. When you are ready to start learning you can visit https://developers.facebook.com/docs/android/scrumptious/ . This series of tutorials will teach you how to add Facebook login to your app, personalize an app by displaying the user's Facebook profile picture and name, retrieve and display a user's friends, add a user's location and and publish an Open Graph Story.
Prior to using Eclipse to create a Facebook application you will want to create the application settings in Facebook. To do this, navigate to Developer Dashboard and click the Create New App button.

The Create New App window displays so you can specify the name for your application, a unique App namespace and a category for your application.
 When you click the Continue button Facebook assigns your application an App ID. This is the value you will add to the strings.xml file in the res -> values folder in Eclipse (as shown in the following picture).

As shown in the following picture your app is automatically placed in Sandbox mode, which means only administrators, developers and testers can see it. If you disable Sandbox mode your application is moved to a "live" state, which means everyone can see it.

Notice a left menu becomes available. The menu includes additional options that enable you to enter all of the information required for your application including the App Details (for additional information visit https://developers.facebook.com/docs/guides/appcenter/#creating). You can also create the Open Graph for your application. If you use Facebook you have most likely seen an Open Graph for other products. The main page collects additional information about your application. One of the fields you will complete is Key Hashes. This field enables you to register the app's hash key with Facebook. If more than one hash key will be used (i.e., a hash key for debugging and one for production); both keys can be added to the field.
To generate the key you will use the keystore.exe tool that was added to your computer when you installed the Java Development Kit (JDK). Also, when you installed the Android SDK a debug.keystore file was added to your computer. The keystore.exe is also a command-line tool so you will need to use the command window (Windows users) or the terminal window (Macintosh users) to execute the commands needed to retrieve the hash key.

If necessary, you can use your computer's search feature to find these files. For more information on the keystore.exe tool and the debug.keystore file you can see my previous article titled Get Started With Kindle Fire Programming: Apps & Games and you can see Hashing Algorithm (How Stuff Works).
Nearly everyone I know "FREQUENTLY" plays games on Facebook. Daily I receive numerous invitations to play a game on Facebook. And, while I'm not a big Facebook gamer I can vouch for many people who are. So, building Facebook games for Android is no doubt a great skill to acquire. The thing I like most about Facebook's game tutorials is that you can learn to build a game not only for Android; but also for the web and the iPhone, which is pretty cool because it enables you build a game that can reach a broader audience if you want to. And, with Facebook the audience is already in place all you have to do is market to them.
To get you started with building Android games for Facebook, the Facebook tutorial teaches you to build a game called Friend Smash, which requires Android 3.0 and higher. To prepare my environment to run the game I used Android 4.3 (API 18), which was already installed on my environment. If you need to download it you can do so using the SDK Manager.

I then created an emulator using Android 4.3 as the Target. I then started the device and installed the Facebook SDK onto this device (using the instructions in the section above titled Install the Facebook on the Android Virtual Device) so I could run the game.

You can then clone the Friend Smash repository from GitHub.com at https://github.com/fbsamples/android-friend-smash. (You can gain access to an online published book and additional Git resource by accessing my previous article titled Programming Mobile Apps for Android With Eclipse.)

OR, you can download the zipped file and extract the files into a folder you create on your computer.

Once you have the files on your computer you can import the projects using the same steps discussed above to import the Facebook SDK and sample projects. Once you complete those steps you can configure the game to use the device you created and then run the game.

You can follow the Friend Smash game tutorial for Android by visiting https://developers.facebook.com/docs/android/games/.
Facebook publishes major code changes every Tuesday; and, it publishes the push schedule for code changes as well as fixes made throughout the week. The Beta Tier and Testing documentation provides additional information on regression testing your applications. Regression testing is done to determine whether or not code changes or fixes impact your application(s); and, if so you can make the necessary updates. For more information visit https://developers.facebook.com/docs/support/beta-tier/.
See also Get Started With Kindle Fire Programming: Apps & Games, which is an article that tells you how to configure Eclipse and Android programming to build Kindle Fire applications and games.
Create a Facebook Developer Account
If you don't have a Facebook account, you must create one to become a Facebook developer. You can then log into your Facebook account and visit the Facebook Developer home page https://developers.facebook.com/. You will need to click the Register button and follow the Registration wizard steps that will walk you through "1. Accepting the terms", "2. Verifying your account", "3. Telling us about you" and "4. Building your integration", which is actually your Congratulations message because you can create an application to get started. (For more information you can refer to the documentation called: "How to Create a Facebook Developer Account" .)
Once you have created a Developer account you will be presented with the Facebook Dashboard, as shown below. You can then use the Create New App button to begin creating your Facebook app (as discussed later in this post).
Facebook Software Development Kits
Facebook provides a number of software development kits (SDK's). Developers can download the SDK that corresponds with the type of applications and/or games developers want to create. Following is a list of the available SDKs used to build Facebook apps and games for mobile devices or the web:
- Facebook SDK for Android - Developers can install this SDK to use Eclipse to build Facebook apps and games for Android.
- Facebook SDK for JavaScript - Developers can install this SDK to build Facebook web-based apps and games for desktops and mobile devices. (For information on the difference between a mobile app and a mobile web app see my article titled Mobile Software Programming: Designing & Building Mobile Apps (Android).)
- Facebook SDK for PHP - Developers can install this SDK to build web-based Facebook apps and games for desktops and mobile devices using PHP.
- Facebook SDK for iOS - Developers can install this SDK to build Facebook apps and games for the iPhone, iPad and iPod.
Facebook SDK for Android
If you haven't configured your development environment to build Android apps you will want to see my article titled Mobile Software Programming: Designing & Building Mobile Apps (Android) to get started. You can then read the article Programming Mobile Apps for Android With Eclipse) before performing the steps outlined in this article. To build Facebook apps or games you must have an environment capable of building Android apps. You can then install the Facebook SDK for Android to get started. The Facebook SDK for Android includes sample code for apps so developers have examples that show how to properly code and design for Facebook as well as use Facebook authentication. And, the Facebook website has tutorials and provides links to working samples.
Once you have configured Eclipse to build Android apps you are ready to further configure your environment to build Facebook apps and games. The remainder of this article will outline how to create an emulator that can run Facebook (so you can test your apps and games), how to use a real Android to run your apps and games, how to import the SDK and samples into Eclipse and how to find sample code and tutorials so you can learn from existing projects.
Download & Extract the Facebook SDK for Android
The Facebook SDK for Android includes sample apps and the FBAndroid-3.5.apk file, which you can install on an emulator to test your Facebook apps. To use an emulator you will need to install the Android 2.2 (API 8) package, create and start the emulator and install the FBAndroid-3.5.apk onto the emulator as discussed below.
You can download the Facebook SDK for Android by visiting https://developers.facebook.com/docs/android/.
Install Android 2.2 (API 8)
To test your Facebook application using an Android Virtual Device you will need to install the Android 2.2 (API 8). To do this from within Eclipse select Window -> Android SDK Manager (alternatively you can access the SDK Manager by locating and clicking the SDK Manager.exe file on your computer). When the Android SDK Manager displays select the Android 2.2 (API 8) options, as shown in the following picture. Then click the button to install the packages.

Create and Start the Android Virtual Device
Once you have installed the Android 2.2 (API 8) you can create an emulator device that uses the Android 2.2 (API 8) as the target so you can run the Facebook samples.
Once you have created the emulator you can start the emulator. The emulator must be running to install the FBAndroid-3.5.apk file.

Install Facebook on the Android Virtual Device
Once the emulator is running you can use the adb.exe file, which was installed when you installed the Android SDK.The adb.exe is the Android Debug Bridge, which is a command-line tool used to communicate with an instance of an emulator or Android devices that are connected to computer running the development environment. If you are a Windows user you will need to launch the Command window (as shown below). (Note that Macintosh users will want to launch the Terminal window in Utilities.)

You will need to change to the directory that has the adb.exe file, which is the sdk\platform-tools folder created when you installed the Android SDK.

After you have installed the FBAndroid-3.5.apk file you will notice the emulator can be used to access Facebook.

If you plan to use a real Android device to test your apps you can download the Facebook app onto your Android device, if you haven't done so already. Whether you use an emulator or real Android device you will be able to run the Facebook SDK samples after you have imported the Facebook SDK into Eclipse.
Using the Facebook SDK & Samples in Eclipse
To setup Eclipse to use the Facebook SDK and import the samples you must import the Facebook SDK folder into Eclipse. This section provides an overview on how to import the Facebook SDK. However, before importing the Facebook SDK you will want to create a new workspace for the Facebook samples.
To import the Facebook SDK and sample apps select File -> Import from the Eclipse menu. Then select Existing Projects Into Workspace and click Next.

Browse to the location that contains the extracted Facebook SDK for Android folder. Select the Facebook-android-sdk-3.5 folder and click Next.

A window displays a list of all the projects to be imported into Eclipse. This window has a "Copy projects into workspace" option, which should be left unselected. Click the "Select All" button to select the Facebook SDK and all projects; next, click Finish. The projects are all imported into Eclipse. You can now run the sample apps and view the code.

To select a target device; or, have Eclipse prompt you for a device you can select Run -> Run Configurations. The Android tab lets you select the project for which you want to select a device; or, have Eclipse prompt you for a device.

After you have selected a project, click the Target tab and select the applicable option. In the following example, the "Always Prompt for a Device" option was selected so Eclipse will always ask the developer what device the project is to run on. Alternatively, you can select the Android emulator running the API 8 package.
If the sample projects show any errors you can clean the projects by selecting Project -> Clean from within Eclipse. You can read more on getting started with the Facebook SDK for Android by visiting https://developers.facebook.com/docs/android/getting-started/facebook-sdk-for-android/.
If you want to run the samples using an emulator device be sure to start the emulator and make sure it is properly running before running the application. If you intend to use an Android device make sure the device is connected and that you have configured the Developer options (for more information see Programming Mobile Apps for Android With Eclipse).

Note that you run the Facebook apps for Android the same way you run any other Android app (i.e., Run As -> Android Application).
In addition to code samples, Facebook provides a number of tutorials that will walk you through building Facebook applications for Android. When you are ready to start learning you can visit https://developers.facebook.com/docs/android/scrumptious/ . This series of tutorials will teach you how to add Facebook login to your app, personalize an app by displaying the user's Facebook profile picture and name, retrieve and display a user's friends, add a user's location and and publish an Open Graph Story.
Creating a Facebook App Details Page
Prior to using Eclipse to create a Facebook application you will want to create the application settings in Facebook. To do this, navigate to Developer Dashboard and click the Create New App button.

The Create New App window displays so you can specify the name for your application, a unique App namespace and a category for your application.


As shown in the following picture your app is automatically placed in Sandbox mode, which means only administrators, developers and testers can see it. If you disable Sandbox mode your application is moved to a "live" state, which means everyone can see it.

Notice a left menu becomes available. The menu includes additional options that enable you to enter all of the information required for your application including the App Details (for additional information visit https://developers.facebook.com/docs/guides/appcenter/#creating). You can also create the Open Graph for your application. If you use Facebook you have most likely seen an Open Graph for other products. The main page collects additional information about your application. One of the fields you will complete is Key Hashes. This field enables you to register the app's hash key with Facebook. If more than one hash key will be used (i.e., a hash key for debugging and one for production); both keys can be added to the field.
To generate the key you will use the keystore.exe tool that was added to your computer when you installed the Java Development Kit (JDK). Also, when you installed the Android SDK a debug.keystore file was added to your computer. The keystore.exe is also a command-line tool so you will need to use the command window (Windows users) or the terminal window (Macintosh users) to execute the commands needed to retrieve the hash key.

If necessary, you can use your computer's search feature to find these files. For more information on the keystore.exe tool and the debug.keystore file you can see my previous article titled Get Started With Kindle Fire Programming: Apps & Games and you can see Hashing Algorithm (How Stuff Works).
The Games People Play (Using Android to Build Facebook Games)
Nearly everyone I know "FREQUENTLY" plays games on Facebook. Daily I receive numerous invitations to play a game on Facebook. And, while I'm not a big Facebook gamer I can vouch for many people who are. So, building Facebook games for Android is no doubt a great skill to acquire. The thing I like most about Facebook's game tutorials is that you can learn to build a game not only for Android; but also for the web and the iPhone, which is pretty cool because it enables you build a game that can reach a broader audience if you want to. And, with Facebook the audience is already in place all you have to do is market to them.
To get you started with building Android games for Facebook, the Facebook tutorial teaches you to build a game called Friend Smash, which requires Android 3.0 and higher. To prepare my environment to run the game I used Android 4.3 (API 18), which was already installed on my environment. If you need to download it you can do so using the SDK Manager.
I then created an emulator using Android 4.3 as the Target. I then started the device and installed the Facebook SDK onto this device (using the instructions in the section above titled Install the Facebook on the Android Virtual Device) so I could run the game.
You can then clone the Friend Smash repository from GitHub.com at https://github.com/fbsamples/android-friend-smash. (You can gain access to an online published book and additional Git resource by accessing my previous article titled Programming Mobile Apps for Android With Eclipse.)

OR, you can download the zipped file and extract the files into a folder you create on your computer.
Once you have the files on your computer you can import the projects using the same steps discussed above to import the Facebook SDK and sample projects. Once you complete those steps you can configure the game to use the device you created and then run the game.
You can follow the Friend Smash game tutorial for Android by visiting https://developers.facebook.com/docs/android/games/.
Beta Tier Testing
Facebook publishes major code changes every Tuesday; and, it publishes the push schedule for code changes as well as fixes made throughout the week. The Beta Tier and Testing documentation provides additional information on regression testing your applications. Regression testing is done to determine whether or not code changes or fixes impact your application(s); and, if so you can make the necessary updates. For more information visit https://developers.facebook.com/docs/support/beta-tier/.
Related Articles
See also Get Started With Kindle Fire Programming: Apps & Games, which is an article that tells you how to configure Eclipse and Android programming to build Kindle Fire applications and games.